- Get link
- X
- Other Apps
Running a small shop means juggling long lines, cash handling, and customer service — all at once. A payment kiosk can make that a lot easier.
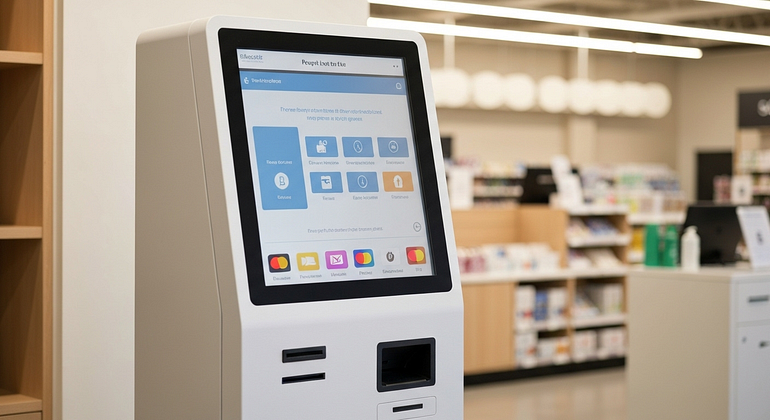
A payment kiosk is a self-service station where customers can scan items, pick options, and pay without needing a cashier. For small retail and service shops — like a boutique, a mini mart, or a coffee counter — it’s a modern way to speed up checkout and improve the customer experience.
In this guide, you’ll learn exactly what a payment kiosk is, how it works, what it costs, its pros and cons, and how to set one up. By the end, you’ll know whether a kiosk fits your shop and your budget.
What Is a Payment Kiosk for Small Shops?
A payment kiosk is a self-service machine that lets customers make purchases, bill payments, or top-ups without help from staff. It works like a digital checkout counter, combining a touchscreen, card reader, and software to process transactions instantly.
Unlike a regular POS (point of sale) system, which is handled by staff, kiosks are used directly by customers. They reduce queue time and free up staff for other tasks, like stocking or making orders.
You’ll find payment kiosks in small shops like:
- Coffee counters for quick grab-and-go orders
- Local boutiques with self-checkout options
- Mini marts with self-billing for snacks and drinks
- Laundromats and mobile stores offering bill pay and top-ups
Simple Definition and How It Differs from a POS
A payment kiosk is basically a touchscreen station with a built-in card reader, QR scanner, and receipt printer that lets shoppers pay on their own.
The difference between a POS and a kiosk is simple:
- POS: Operated by staff at the counter
- Kiosk: Operated by the customer
Both can connect to the same inventory and payment system. A kiosk can either be standalone or linked to your POS, depending on your setup.
Common Kiosk Types Small Stores Use
Here are four kiosk types perfect for small retail and service shops:
- Self-checkout kiosks — For barcoded goods in convenience stores or mini marts. Example: a bodega where customers scan snacks and drinks.
- Order-and-pay kiosks — For made-to-order counters like coffee or sandwich shops. Example: a café where customers customize drinks.
- Bill payment kiosks — For laundromats or mobile stores. Example: a customer topping up a prepaid phone plan.
- Pickup and returns kiosks — For stores offering online order pickups or quick returns.
When a Kiosk Makes Sense — and When It Doesn’t
A kiosk is a good fit if your shop has:
- Regular lines during rush hours
- Repeat orders with simple pricing
- A small team that needs to multitask
- Customers who prefer quick, contactless checkout
It might not be ideal if:
- You have low daily foot traffic
- Your products need personal advice or checks (like jewelry or prescription items)
- You only accept cash
- You deal with complex pricing or age verification often
Tip: Track your peak-hour lines and transaction times before investing.
Key Parts at a Glance
Hardware:
- Touchscreen display: for browsing and payment
- Card reader: supports chip, tap, and swipe
- QR/barcode scanner: for item scanning and mobile payments
- Receipt printer: for order or payment proof
- Cash acceptor: optional, for hybrid payment
- Stand or wall mount: for placement flexibility
- Camera (optional): for security
Software:
- Kiosk app interface
- Menu or catalog system
- Payment gateway
- Inventory sync with POS

How a Payment Kiosk Works Step by Step
Let’s break down how a payment kiosk functions from power-on to end-of-day close.
Hardware and Connections in Plain Language
A kiosk plugs into a power outlet and connects to the internet using Ethernet, Wi-Fi, or LTE.
It’s like a smart tablet that talks to your payment system.
If power drops, a small UPS battery backup helps avoid data loss.
The touchscreen, card reader, and printer usually connect via USB or Bluetooth, allowing smooth communication for fast, secure transactions.
Software and Payment Flow
Here’s the simple software process behind every payment:
- The kiosk app displays your items, pricing, and offers.
- The POS or catalog system tracks prices, tax, and inventory.
- The payment gateway encrypts and sends the payment data to the processor.
Tokenization means customer card numbers are replaced by secure digital tokens — so your shop never stores card data.
Kiosks today support EMV chip, contactless cards, and mobile wallets like Apple Pay and Google Pay for smooth transactions.
Customer Checkout Journey: Tap to Receipt
Here’s what your customer sees:
- Wake the screen and pick language
- Browse or scan items
- Choose options (like size or add-ons)
- Review order and apply promo codes
- Pay with tap, chip, or QR
- Collect the printed receipt
- Wait for order or pickup item
Pro tip: Use big buttons, clear item photos, and a help button to improve ease of use.
What Happens After Payment for the Owner
After each payment:
- The inventory updates automatically
- A kitchen or counter ticket prints, if applicable
- End-of-day batch settlement sends payments to your merchant account
- Reports show sales, tax, and refunds
Owners can also update menus, photos, and prices from their POS system — and changes appear instantly on the kiosk.
Benefits, Drawbacks, and Real Costs for Small Shops
Let’s look at the practical side — the pros, the limits, and the money part.
Why Small Shops Like Kiosks
Top benefits include:
- Faster lines and shorter waits
- Higher average order value (from on-screen add-ons)
- Reduced labor pressure
- Multilingual support for customers
- 24/7 operation without staff fatigue
- Easy upsells and cross-sells
Example: A small coffee counter with one kiosk can serve 20–30% more customers per hour without adding staff.
Limits and Pitfalls to Watch
Every tech has trade-offs. Watch for:
- Misuse or theft if placement isn’t secure
- Some customers may need help at first
- Regular cleaning and paper refills
- Possible Wi-Fi outages
- Accessibility requirements
Tip: Always keep one staffed counter or a help button for edge cases and accessibility.
Cost Breakdown in 2025
Typical 2025 pricing (USD):
- Hardware: $1,200 — $6,000
- Cash acceptor add-on: $2,000 — $4,000
- Installation: $300 — $1,200
- Software: $49 — $149/month
- Support plan: $20 — $75/month
- Optional LTE: $10 — $20/month
- Payment processing: 2.4% — 3.5% + $0.10 per sale
Bundles may reduce upfront costs but increase monthly fees.
Quick ROI Math Example
If a kiosk:
- Saves 10 minutes of staff time per hour
- Increases average order by $1
- Handles 150 orders/day
Then monthly savings and profit lift could total $600–$900, depending on traffic and processing fees.
That means your kiosk could pay for itself in 4–9 months — faster if traffic or upsells grow.
How to Choose, Set Up, and Run Your Kiosk
Here’s your action plan for picking, installing, and managing your payment kiosk.
Pick the Right Vendor and Features
Use this checklist:
- EMV + Tap to Pay support
- Works with your POS or offers all-in-one
- Offline mode for short outages
- Simple menu editor
- ADA-friendly design
- Support during your business hours
- Clear warranty and pricing
- Request a demo and total cost quote

Plan Placement and Line Flow
Ideal placement:
- Near entrance or main product zone
- Space for one or two customers
- Power and internet nearby
- Comfortable height: 42–48 inches
- Use floor arrows or small barriers for line guidance
Visibility and accessibility are key for engagement.
Setup Steps and Go-Live Checklist
- Unbox and mount kiosk
- Connect power and network
- Log in to kiosk app
- Sync menu, tax, and pricin
- Add images and modifiers
- Test payment with a small amount
- Print sample receipt
- Set up promos or loyalty offers
- Run a soft launch at a quiet hour
- Create a rollback plan in case of technical issues
Train Staff, Help Customers, and Keep It Running
Train your team to:
- Guide first-time users
- Clear printer jams
- Clean screens daily
- Restart the app if frozen
- Switch to manual checkout if needed
Set a daily checklist for paper rolls, sanitizer, and software updates.
Monitor uptime and keep vendor support contacts handy.
Conclusion
A payment kiosk is a self-service checkout that saves time, speeds up lines, and frees staff for more valuable work.
Now you know how it functions, what it costs, and how to set one up. The pros often outweigh the cons — but only if your shop has steady traffic and clear pricing.
Your next steps:
- Measure your peak-hour lines.
- Request demos and quotes from kiosk vendors.
- Start with one kiosk and track results for 30 days.
If it boosts your sales or saves time, scaling up will be an easy call.
FAQs About Payment Kiosks for Small Shops
Q1. How much does a payment kiosk cost for a small shop?
Most kiosks range from $1,200 to $6,000, depending on features. Add monthly software and support fees of $69–$200.
Q2. Can I still accept cash payments?
Yes, some kiosks include a cash acceptor or recycler. You can also keep one staffed counter for cash transactions.
Q3. Do I need special internet for a kiosk?
A stable Wi-Fi or Ethernet connection is fine. Some kiosks also support 4G/LTE for backup connectivity.
Q4. How secure are payment kiosks?
They use EMV, tokenization, and PCI-compliant gateways, meaning your shop never stores card data.
Q5. Will older customers struggle with kiosks?
Most adapt quickly. Keep clear on-screen instructions and a help button or staff nearby for assistance.
Q6. What’s the payback period for a kiosk?
Usually 4–9 months, depending on sales volume and labor savings.
Q7. Can I update products and prices easily?
Yes — most kiosks sync with your POS, so updates appear automatically on the screen.
Comments
Post a Comment